Fabric Mirroring for Azure SQL Database

Part A - Azure trial account setup
Step 1 - Create a free Azure trial account
Go to azure.microsoft.com/free. Click "Start free." You get $200 credit for 30 days - more than enough for this test. Sign in with your Microsoft account (the same one you use for Fabric if possible. It simplifies permissions).
Step 2 - Create a Resource Group
In the Azure portal - Create a resource - Resource group. Name it fabric-mirroring-test. Region: West Europe
Step 3 - Create an Azure SQL Database with AdventureWorksLT
Create a resource - Azure SQL.
Fill in:
- Resource group: fabric-mirroring-test
- Database name: mirrortest-db
- Server: create new - name it something like
carlos-sql-dev- regionFrance Central- authentication: use SQL authentication, set an admin login and password you'll remember - Compute + storage: click "Configure database" and choose the cheapest service tier (~5$/month)
- Backup storage: locally redundant (cheapest)
On the Additional settings tab - under "Use existing data" - select Sample. This loads the AdventureWorksLT sample database automatically - no need to import anything manually.
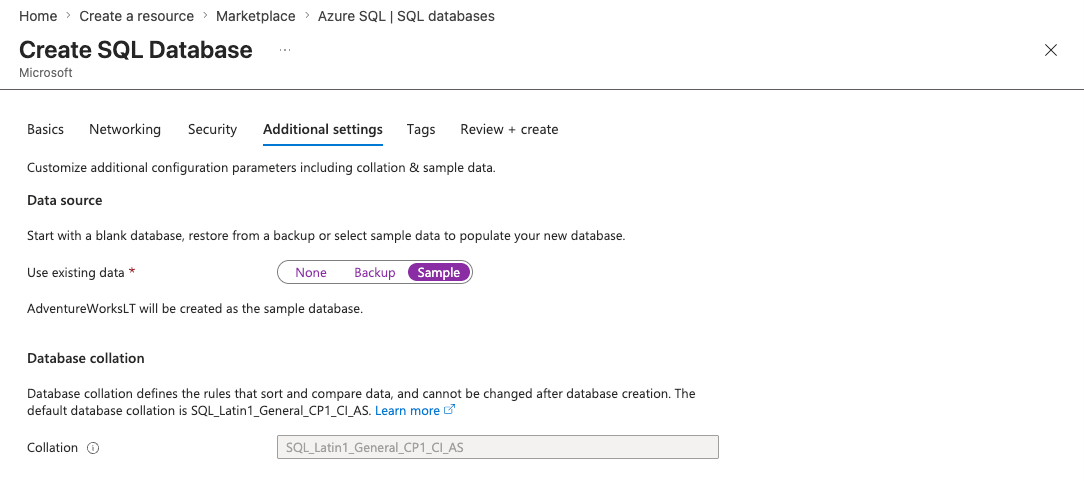
Click "Review + create" then "Create." Takes 2-3 minutes.
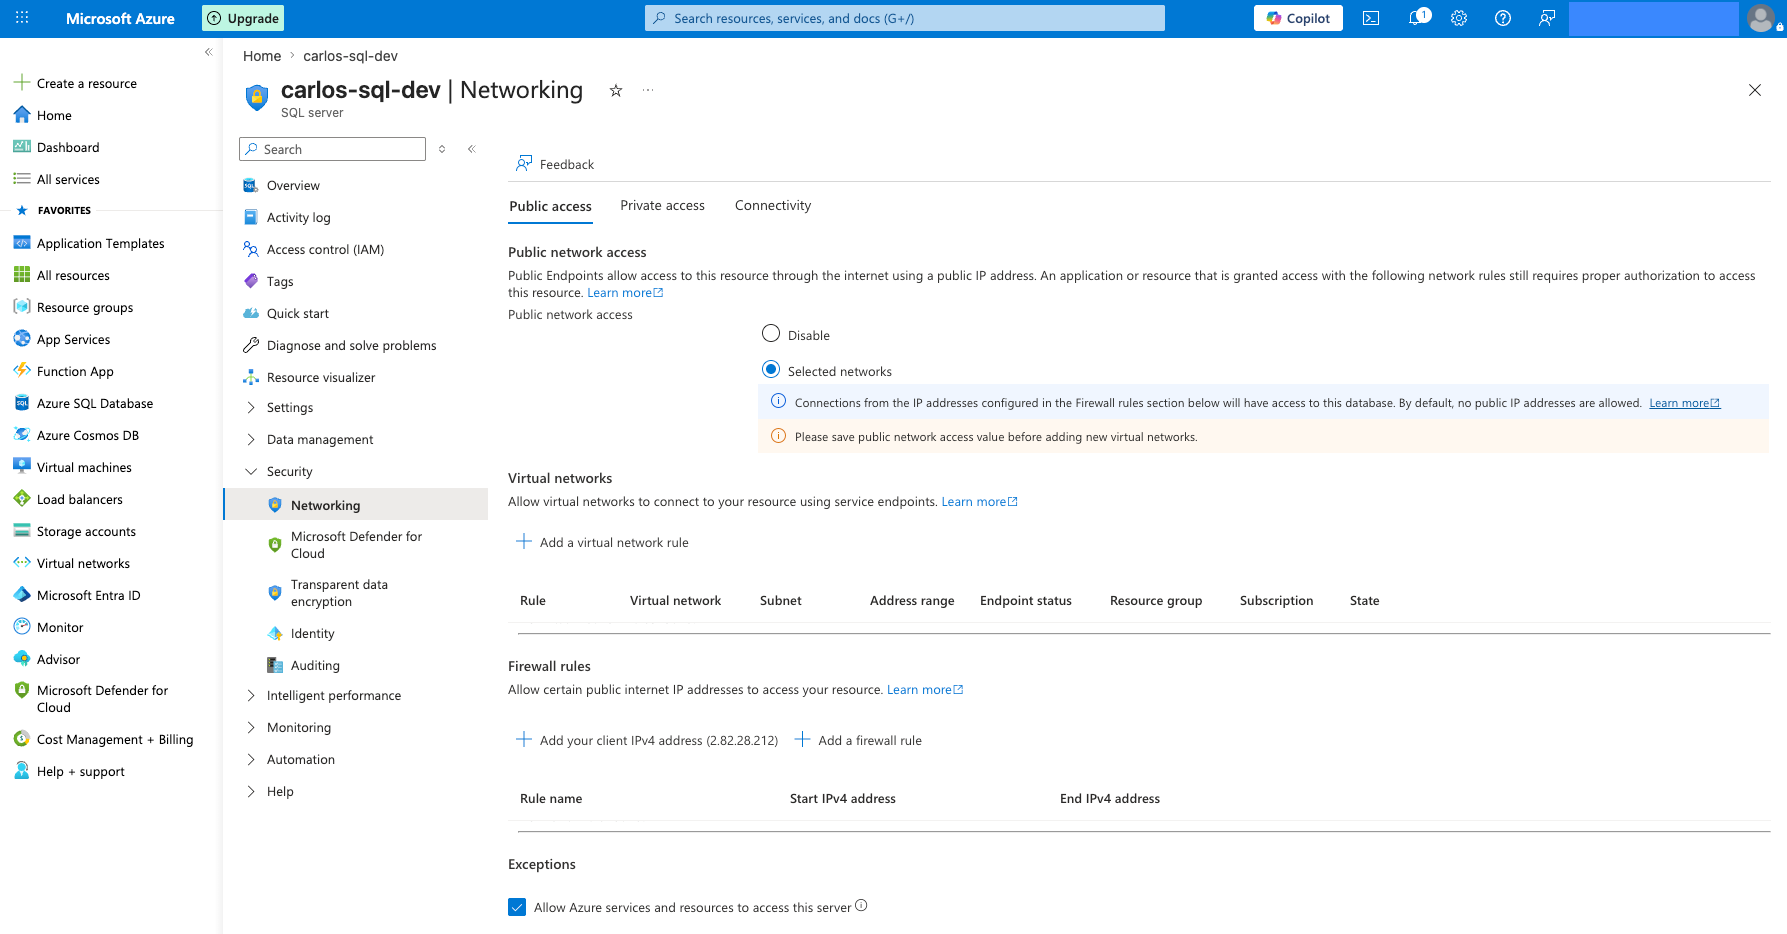
Step 4 - Configure networking to allow Fabric access
Once the database is created, open the SQL Server resource (not the database but the server). Go to Security - Networking.
- Set "Public network access" to Selected networks
- Under "Exceptions," tick "Allow Azure services and resources to access this server"
- Click Save
Step 5 - Enable System Assigned Managed Identity (SAMI)
Still on the SQL Server resource - go to Security - Identity. Under "System assigned," toggle the Status to On. Click Save.
This is required for Fabric to publish data to OneLake.
Step 6 - Create a Fabric login and user on the SQL Database
Open the Azure SQL Database (not the server) - go to Query editor in the portal. Log in with your SQL admin credentials. (You will probably need to add your IP to the whitelist).
Run the following sql statements in order to create an user with permissions to access your database later:
-- Run this directly on mirrortest-db (no need to touch master)
CREATE USER fabric_mirror_user WITH PASSWORD = 'YourSecurePassword123!';

GRANT SELECT ON SCHEMA::SalesLT TO fabric_mirror_user;
GRANT ALTER ANY EXTERNAL MIRROR TO fabric_mirror_user;
GRANT VIEW DATABASE PERFORMANCE STATE TO fabric_mirror_user;
GRANT VIEW DATABASE SECURITY STATE TO fabric_mirror_user;

GRANT VIEW DEFINITION ON SCHEMA::SalesLT TO fabric_mirror_user;
GRANT VIEW ANY COLUMN MASTER KEY DEFINITION TO fabric_mirror_user;
GRANT VIEW ANY COLUMN ENCRYPTION KEY DEFINITION TO fabric_mirror_user;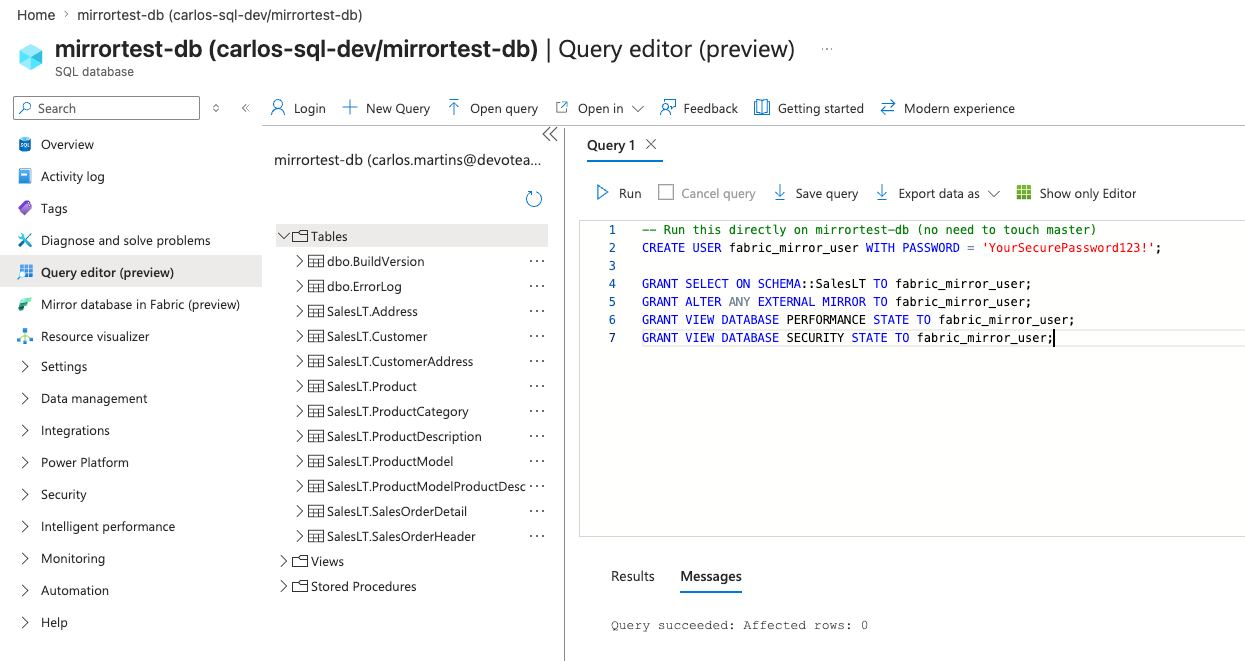
Part B - Set up Mirroring in Fabric
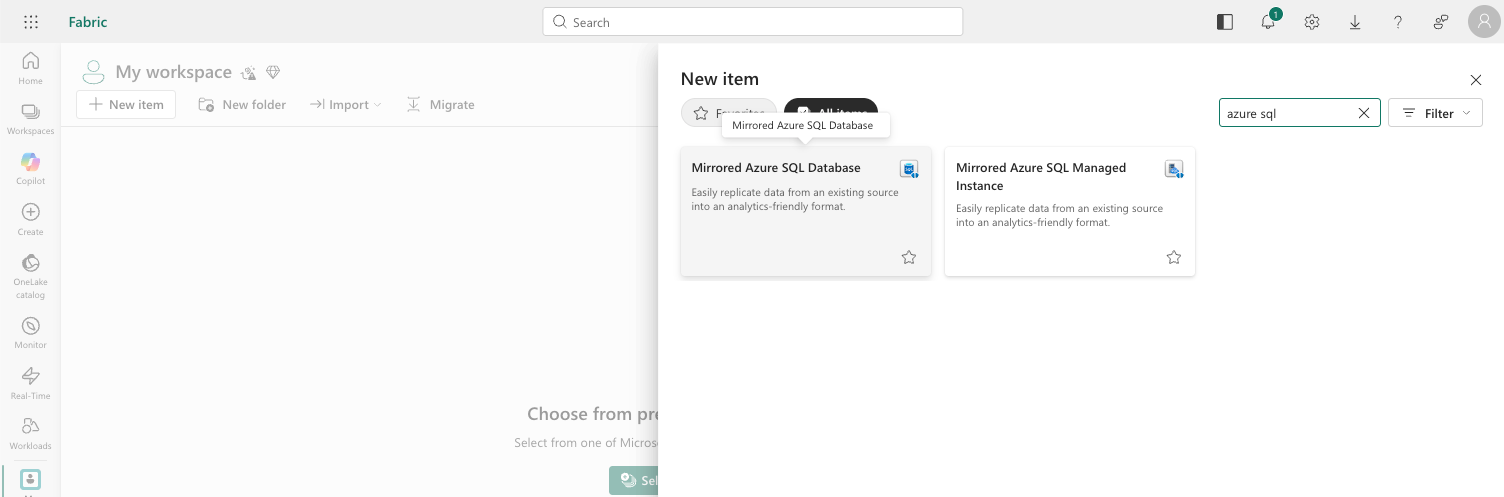
Step 7 - Create the Mirrored Database item in Fabric
Go to your Fabric workspace. + New item - scroll to the Data Warehouse section - select Mirrored Azure SQL Database.
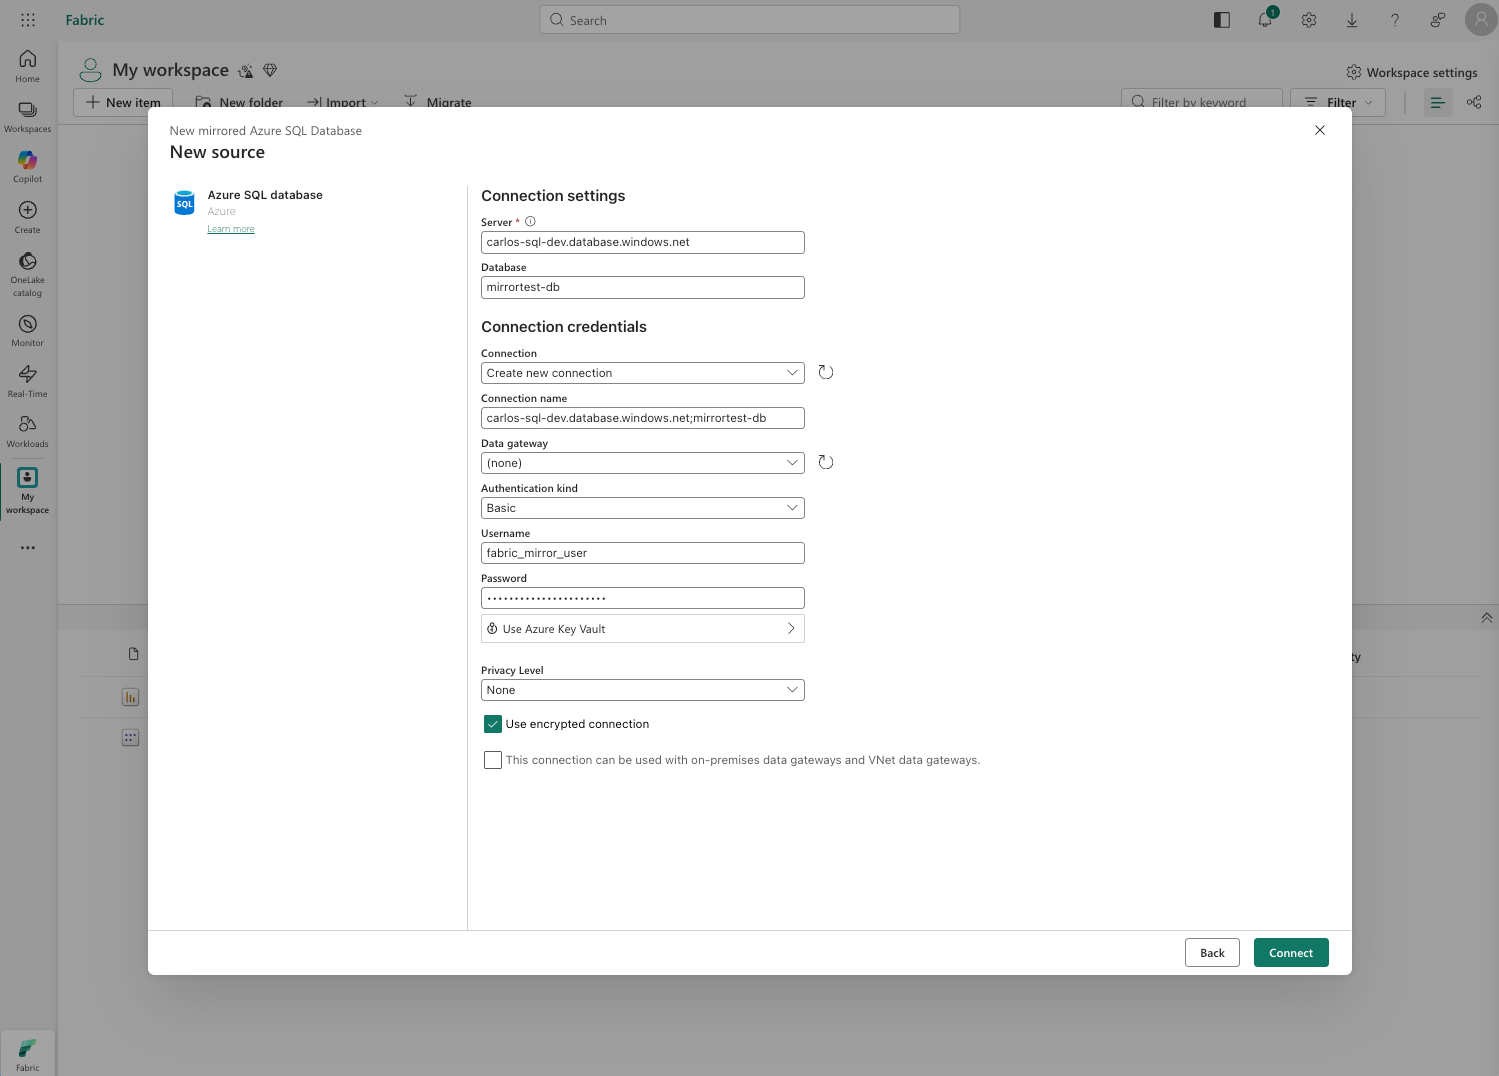
Step 8 - Connect to your Azure SQL Database
In the setup wizard:
- Create new connection
- Server: paste your server name from the Azure portal (format:
carlos-sql-dev.database.windows.net) - Database: mirrortest-db
- Authentication: Basic (SQL Authentication)
- Username/Password: the
fabric_mirror_usercredentials you created - Click Connect
Step 9 - Configure what to mirror
The next screen shows you the tables available. Leave "Mirror all data" selected - this will mirror all AdventureWorksLT (SalesLT) tables and any new ones added later.
Click Mirror database.
Step 10 - Monitor the initial snapshot
Mirroring will start an initial snapshot - copying all existing data into OneLake. This takes 2-5 minutes for SalesLT. You'll see a status screen showing each table being replicated.
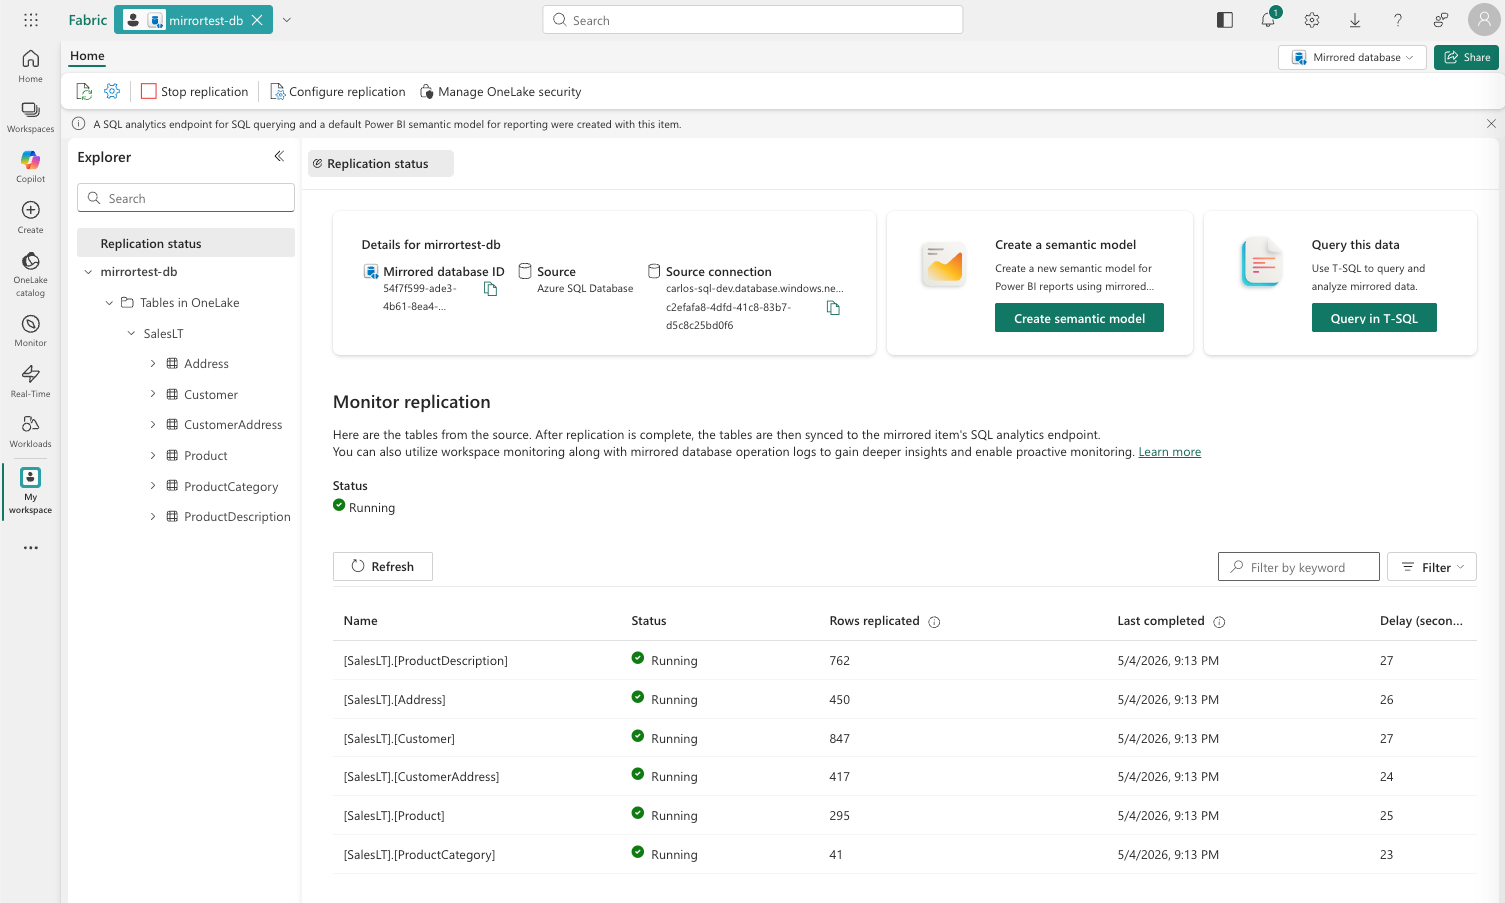
Step 11 - Explore the data in Fabric
Once the snapshot completes, the mirrored database appears as a queryable item in Fabric. Open it and click New SQL query. Try:
-- Basic query on mirrored data
SELECT TOP 20
    c.CompanyName,
    a.AddressLine1,
    a.City
FROM SalesLT.Customer c
INNER JOIN SalesLT.CustomerAddress ca ON c.CustomerID = ca.CustomerID
INNER JOIN SalesLT.Address a ON ca.AddressID = a.AddressID
ORDER BY c.CompanyName;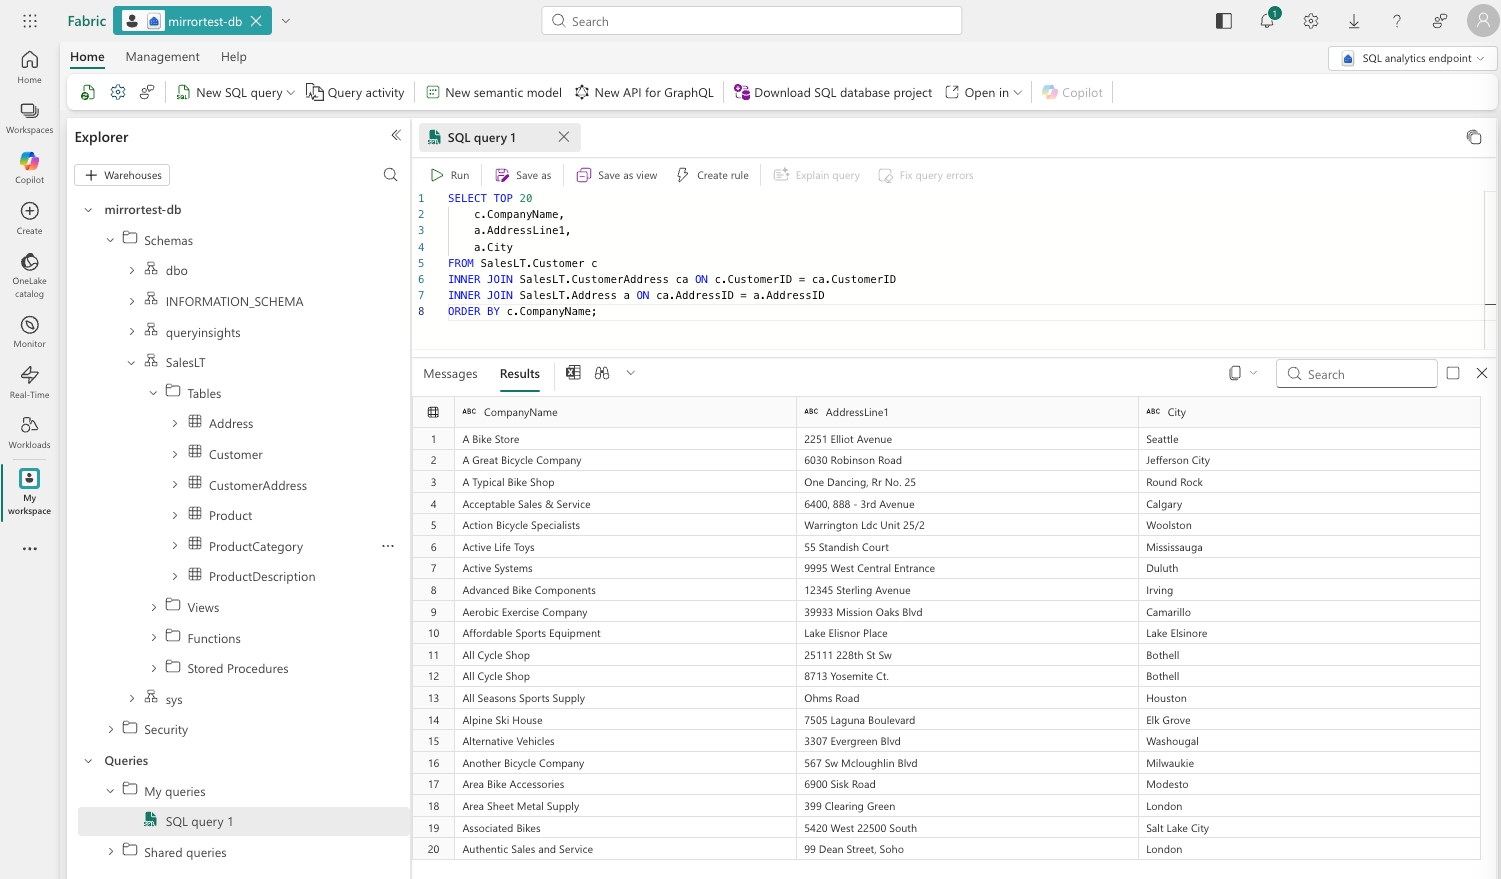
Step 12 - Test near-real-time replication
Now the interesting part. Go back to the Azure portal - Query editor on your SQL Database - and insert a new record:
-- Insert a new customer in Azure SQL
INSERT INTO SalesLT.Customer
(NameStyle,Title,FirstName,MiddleName,LastName,Suffix,CompanyName,SalesPerson,EmailAddress,Phone,PasswordHash,PasswordSalt,rowguid,ModifiedDate)
VALUES
    (99999,'False','Mr.','Carlos','J.','Martins','Clouding Data','cmartins','carlos.martins@cloudingdata.ai','910000000','L/Rlwxzp4w7RWmEgXX+/A7cXaePEPcp+KwQhl2fJL7w=','1KjXYs4=', NEWID(), GETDATE());
Wait 30-60 seconds, then go back to Fabric and query:
SELECT * FROM SalesLT.Customer WHERE CompanyName = 'Clouding Data';
Note the latency. How long did it take? Just a few seconds and you have your data refreshed. No Pipelines, no hard syncs!
Give it a try.. in a few minutes you have everything done!
I'm a Microsoft Fabric Practice Lead and data engineering consultant with 13 years of experience across BI, cloud data platforms, and analytics engineering. Currently building on Microsoft Fabric.
Follow on LinkedIn · Subscribe to cloudingdata.ai